Fix Broken Videos
with Untrunc
Recover corrupted or truncated MP4, MOV, and M4V files using a healthy reference video. Free, open-source, and trusted by videographers worldwide.
What Is Untrunc?
A free, open-source video repair tool that recovers corrupted and truncated MP4, MOV, and M4V files using a healthy reference video.
Untrunc is a free, open-source command-line utility for repairing corrupted and truncated MP4, M4V, MOV, and 3GP video files. When a recording is cut short by a power failure, a full memory card, a crashed application, or unexpected camera shutdown, the resulting video file loses critical structural metadata known as the “moov atom.” Without this atom, the file is unplayable in any media player. Untrunc reads that structure from a healthy reference video filmed with the same camera and codec settings, then reconstructs the damaged file’s index to produce a playable, repaired output.
Origins and Development
The project was originally written by Federico Ponchio, a researcher at Italy’s CNR ISTI (National Research Council), and first published on GitHub in 2013. The most widely used version today is the anthwlock fork, which extends the original with pre-built Windows binaries, roughly 10x faster processing, and improved compatibility with files from modern cameras including GoPro, Sony XAVC, and DJI. Several other forks exist for specific platforms, including fr0stb1rd’s AUR package for Arch Linux and a Docker-based version for containerized environments.
On Windows, the anthwlock release provides a standalone .zip archive that needs no installation. Simply extract the folder, and you can run either the command-line executable (untrunc.exe) or the included GUI wrapper (untrunc-gui.exe) without any additional setup.
Who Uses Untrunc?
Untrunc attracts a wide range of users who deal with interrupted video recordings. Dashcam and security camera owners are among the most common, since those devices frequently cut recordings short when storage fills or the power is disconnected without a proper shutdown sequence. GoPro and DJI drone pilots rely on Untrunc to recover footage from crash-interrupted shoots, where the camera powered off mid-write. OBS screen recorders who experience software crashes mid-stream, videographers at live events dealing with storage card errors, and professionals working with large Sony XAVC RAW captures all use Untrunc as their go-to free recovery tool.
Because the tool works at the container level rather than re-encoding the video data, it does not degrade quality. The repaired file retains the original codec, resolution, frame rate, and audio tracks exactly as they were captured.
The Open-Source Advantage
Untrunc is released under the GPL-2.0 license with its source code publicly maintained on GitHub. That transparency is meaningful when handling sensitive footage: dashcam evidence, professional shoots, or family archives. Unlike paid alternatives such as Stellar Repair for Video (around $59) or Grau GmbH Video Repair Tool (around $39), Untrunc contains no adware, no bundled software, and no data collection. It runs entirely offline and handles files of any size, including 4K recordings and files over 2 GB.
One-line repair: The entire repair process comes down to a single command: untrunc reference.mp4 broken.mp4. Untrunc reads the moov atom from reference.mp4, applies the structure to broken.mp4, and writes the repaired file as broken_fixed.mp4 in the same directory. The original file is never modified.
Key Features
Everything Untrunc does to recover your footage — from moov atom reconstruction to multi-platform support.
Moov Atom Reconstruction
Untrunc rebuilds the missing or corrupt moov atom by reading codec parameters, track layout, and sample table data from a healthy reference video. The reference video must come from the same camera with the same recording settings, but it does not need to be the same length or content. This approach recovers the structural index without re-encoding or modifying the raw media data in the broken file.
10x Faster Processing
The anthwlock fork rewrote the core sample scanning algorithm to operate roughly 10 times faster than the original ponchio version. Long recordings that took many minutes on the original tool typically complete in under a minute on the improved fork. This speed improvement is especially noticeable on large files — a 10 GB security camera recording that took 20 minutes now processes in under 2 minutes on a modern desktop.
MP4, MOV, M4V, and 3GP Support
Untrunc handles all MPEG-4 container formats: MP4 (the most common), MOV (Apple QuickTime), M4V (iTunes/Apple TV format), and 3GP (used by older mobile devices and GoPro). The container structure is consistent across all four formats, so the same moov atom reconstruction technique applies to each. Support extends to files with H.264, H.265, HEVC, and AAC codecs, covering virtually all consumer camera output.
No File Size Limit
Unlike some recovery tools that cap recoverable file sizes at 2 GB or 4 GB, Untrunc supports files of any size. It handles large RAW video exports, multi-hour security recordings, and uncompressed 4K source files without issues. The tool operates entirely in memory-efficient streaming mode, so it can process files larger than your available RAM. This makes it practical for professional video workflows involving large ProRes, XAVC, or HEVC files.
GoPro and Action Camera Compatibility
GoPro cameras are one of the most common sources of truncated MP4 files, since they record directly to microSD cards and write the moov atom only at the end of each recording session. A crashed camera or removed card mid-recording leaves the file without that final write. Untrunc has specific handling for GoPro’s custom MP4 structure and is regularly tested against Hero 9, Hero 10, Hero 11, and Hero 12 footage in the community.
Sony XAVC Video Support
Sony’s XAVC codec family, used in professional Alpha cameras, FX series cinema cameras, and broadcast camcorders, stores video in an MP4 wrapper with custom atom extensions. Untrunc’s anthwlock fork added XAVC-specific handling so professionals shooting on Sony cameras can recover corrupted high-bitrate footage. This support extends to XAVC S (consumer) and XAVC (professional) variants recorded to SD cards or CFexpress media.
Audio-Video Sync Repair
Truncated videos often suffer from audio-video desynchronization in addition to structural corruption. Untrunc includes a stretch-to-match mode that adjusts the audio track duration to align with the recovered video track length. This prevents the common issue of audio that cuts out or runs too long relative to the video after repair. The sync correction is applied automatically during reconstruction and does not require any additional configuration from the user.
One-Command CLI Simplicity
The repair workflow requires a single command: untrunc reference.mp4 broken.mp4. There is no configuration file, no wizard, and no required flags. Optional flags handle edge cases: -s skips unknown atoms, --stretch adjusts audio sync, and -log sets verbosity. The Windows GUI wraps the same logic with a point-and-click file picker for users who prefer a visual interface.
Cross-Platform Support
Untrunc runs on Windows 7 through Windows 11 (both 32-bit and 64-bit), Linux via source build, Docker container, or Snap package, and macOS via Homebrew. On Windows, no installation is needed — the extracted .zip folder runs directly. On Linux, the rodolfoap/untrunc Docker image provides a ready-to-run container that bypasses the FFmpeg library build requirements entirely. macOS users can install with a single brew install untrunc command.
Advanced Diagnostic Logging
Untrunc includes a multi-level logging system controlled by the -log flag (0 to 4). At higher levels, the log reports every atom it reads from the reference file, each frame it identifies in the broken file, and any unknown byte sequences it encounters. The Analyze tab in the GUI provides a dedicated dump function for inspecting file structure, useful for diagnosing why a particular repair did not produce a playable result.
System Requirements
Untrunc is lightweight and runs on almost any hardware. Here are the minimum and recommended specifications for Windows.
| Component | Minimum | Recommended |
|---|---|---|
| Operating System | Windows 7 SP1 (32-bit or 64-bit) | Windows 10 or Windows 11 (64-bit) |
| Processor (CPU) | 1 GHz single-core, any x86 or x64 | 2 GHz dual-core or faster (for large files) |
| RAM | 256 MB available | 1 GB or more for large video files |
| Disk Space | 10 MB (tool only) | Enough free space for the repaired output file |
| FFmpeg Libraries | Not required (standalone binary) | FFmpeg 3.3.9+ recommended for best codec coverage |
| Reference Video | Same camera, same codec settings | Same camera, same resolution, same recording mode |
| Internet Connection | Not required after download | Not required — Untrunc runs fully offline |
Linux and macOS: On Linux, build dependencies include libavformat-dev, libavcodec-dev, and libavutil-dev (FFmpeg development libraries). Alternatively, use the Docker image (rodolfoap/untrunc) to avoid compiling from source. On macOS, Homebrew handles all dependencies automatically.
Download Untrunc
Free to download and use. No installation required on Windows — just extract and run.
Screenshots
See Untrunc in action — the GUI interface and repair workflow on Windows.
Getting Started with Untrunc
A complete walkthrough from download to your first successful video repair — including command-line and GUI instructions.
Downloading Untrunc
Head to our Download section above and click the “Download Untrunc” button for your system. Windows users should download the 64-bit ZIP unless you are on a 32-bit system (32-bit Windows 7 or 8). The 64-bit build is faster and handles larger files, so choose it whenever possible.
The download is a .zip archive containing the untrunc.exe command-line binary and untrunc-gui.exe for those who prefer a graphical interface. Both are standalone executables — no installer, no registry changes, and no DLL dependencies to manage. The file size is small (under 5 MB), so the download completes in seconds on most connections.
Which file to choose: If you are on Windows 10 or Windows 11, download the x64 (64-bit) ZIP. If you are on a very old Windows 7 32-bit system, download the x32 ZIP. For Linux and macOS, see the GitHub repository linked in the Download section.
Once downloaded, right-click the ZIP file in Windows Explorer and select “Extract All.” Choose a convenient location such as C:\Tools\untrunc\. You do not need to run any installer. The extracted folder is immediately ready to use.
Installation and Initial Setup
After extracting the ZIP, open the resulting folder. You will see these files:
untrunc.exe— the command-line tooluntrunc-gui.exe— the graphical user interface- Various DLL files required by the executables (do not delete these)
No PATH setup is required if you plan to use the GUI. If you want to run untrunc.exe from any folder via Command Prompt or PowerShell, add the untrunc folder to your Windows PATH via System Properties > Environment Variables > Path.
Windows SmartScreen warning: When you first run either executable, Windows may show a SmartScreen popup saying “Windows protected your PC.” This is expected for unsigned open-source software. Click “More info,” then “Run anyway” to proceed. The tool is safe — it is an open-source project with auditable code on GitHub.
On Windows 10 and 11, you can also add the folder to the PATH permanently so you can run untrunc from any directory. Search for “Environment Variables” in the Start menu, open it, find Path under System Variables, and add the path to your untrunc folder.
Preparing Your Files
Before running Untrunc, you need two files ready in a folder you can navigate to easily:
- The reference video — a healthy, fully playable MP4 or MOV recorded by the same camera using the same video mode, resolution, and frame rate as the broken file. It does not need to be the same content or the same length, just the same camera in the same recording mode.
- The broken video — the corrupted or truncated file you want to repair. This file may show as 0 bytes, refuse to open, or play only a few seconds before cutting off.
Reference video requirements: The reference and broken files must come from the same camera model in the same video mode. For example, if your broken GoPro file was recorded at 4K/60fps, your reference should also be a GoPro file from the same camera recorded at 4K/60fps. Mismatched codecs or resolutions will prevent Untrunc from reconstructing the correct sample table and produce an unplayable output.
Put both files in the same folder as the Untrunc executable for simplest use, or note their full file paths. On Windows, you can hold Shift and right-click a file to get “Copy as path” for easy path copying.
Check the broken file’s size. If it is 0 bytes, the recording was never written to disk and Untrunc cannot recover it. Untrunc works when the raw video data is present but the index is missing — a broken file with actual data (non-zero file size) is a good candidate for recovery.
Running Your First Repair
You can repair your video using either the GUI or the command line. Both methods produce identical results.
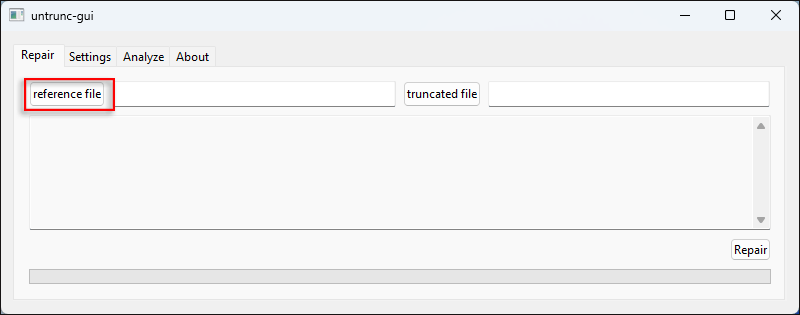
Using the GUI (recommended for beginners):
- Double-click
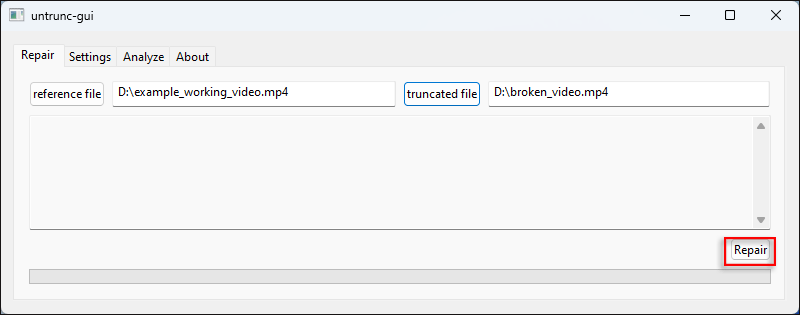
untrunc-gui.exeto open the application. - On the Repair tab, click the button next to the “Reference file” field and navigate to your healthy reference video.
- Click the button next to the “Truncated file” field and select your broken/corrupted video.
- Click the “Repair” button in the bottom-right corner.
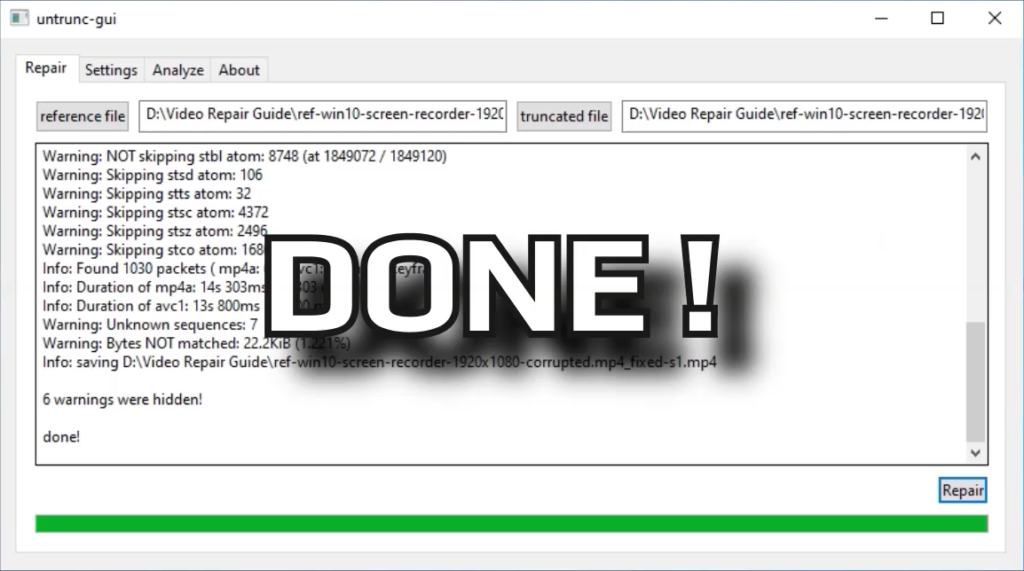
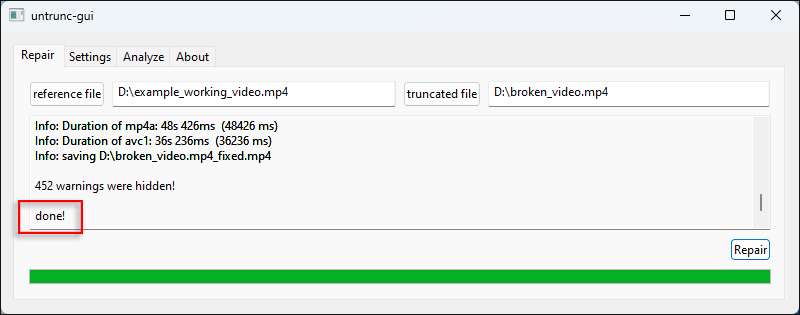
- Watch the log output area in the center of the screen — you will see lines like “Analyzing reference video… done” followed by progress through the broken file’s samples.
- When complete, the status label changes and the repaired file appears in the same folder as the broken file, named with
_fixedappended (e.g.,recording_fixed.mp4).
Using the command line:
Open Command Prompt (search “cmd” in the Start menu) and navigate to the untrunc folder:
cd C:\Tools\untrunc
Run the repair with your two files:
untrunc.exe "C:\Videos\reference.mp4" "C:\Videos\broken.mp4"
Untrunc prints its progress to the console. A successful run ends with a line like:
Output: broken_fixed.mp4
Open the _fixed file in VLC or Windows Media Player to verify it plays correctly. Check the duration, audio sync, and video quality. The original broken file is not modified.
Common CLI flags: Add -s to skip unknown atoms if repair fails on the first try. Use --stretch if the repaired video has audio-video sync problems. Set -log 4 for maximum verbosity to diagnose difficult cases.
Tips, Tricks, and Best Practices
Always keep a reference video from every camera you own. The biggest reason Untrunc repairs fail is not having a suitable reference. Get into the habit of keeping one short, healthy clip from each camera at each resolution you regularly use. Store these reference files in a dedicated folder so you can find them quickly when needed.
Try multiple reference videos if the first attempt fails. If the repaired file is unplayable, try a different reference clip from the same camera. Minor differences in codec initialization between clips can affect how well Untrunc reconstructs the sample table. A clip shot on the same day in the same location is ideal.
Use VLC to verify the output. VLC is more tolerant of minor container issues than Windows Media Player. If the _fixed file plays in VLC but not other players, it repaired successfully and you can re-mux with FFmpeg for full compatibility:
ffmpeg -i broken_fixed.mp4 -c copy output_final.mp4
Common CLI flags reference:
| Flag | Purpose | When to Use |
|---|---|---|
-s | Skip unknown atoms | First fallback if default repair fails |
--stretch | Fix audio-video sync | Audio cuts off or is out of sync in repaired file |
-log 4 | Maximum logging | Diagnosing difficult repair failures |
--keep-unknown | Preserve unknown atoms | Files with custom GoPro or Sony metadata |
-t N | Set step size to N | Very fragmented or damaged files |
Where to get help: The anthwlock/untrunc GitHub Issues page is the best place for specific repair problems. Include your camera model, reference and broken file characteristics, and the full log output (with -log 4). The VideoHelp.com forum also has an active thread on Untrunc where experienced users share solutions for common camera types.
Staying current: Untrunc has no built-in updater. Check the GitHub Releases page periodically for new versions. Alternatively, watch the repository by clicking the “Watch” button on GitHub to receive release notifications by email.
Frequently Asked Questions
Answers to the most common questions about downloading, using, and troubleshooting Untrunc.
Is Untrunc free to download and use?
Yes, Untrunc is completely free to download and use. The software is released under the GNU General Public License version 2.0 (GPL-2.0), which means it is free for personal and commercial use with no license fees, subscription costs, or usage limits.
Both the command-line tool and the graphical user interface are included at no charge in the Windows ZIP download. There is no “Pro” or “Premium” tier, no trial period, and no feature that is locked behind a paywall. Untrunc is entirely community-maintained open-source software with no commercial interests behind it.
Compared to paid video repair tools like Stellar Repair for Video ($59), Wondershare Video Repair ($49.95), or Grau GmbH Video Repair Tool ($39), Untrunc delivers the same core moov atom reconstruction capability at zero cost. The only trade-off is that it lacks a polished interface and requires a healthy reference video from the same camera.
Pro tip: Download from the official anthwlock/untrunc GitHub Releases page or from our Download section above — both serve the same files directly from GitHub’s CDN. Avoid third-party mirror sites that bundle untrunc with adware installers.
See the Download section on this page for direct links to the Windows x64 and x32 builds.
Is Untrunc safe for Windows 10 and Windows 11?
Yes, Untrunc is safe to download and run on Windows 10 and Windows 11. The software is open-source (GPL-2.0) and the full source code is publicly available on GitHub, so anyone can audit it for malicious behavior. Multiple independent security researchers and antivirus vendors have scanned the Windows binaries and found no malware or adware.
You may see a Windows Defender SmartScreen warning the first time you run untrunc.exe or untrunc-gui.exe. This is a standard Windows behavior for downloaded executables that do not have a code signing certificate — most open-source tools trigger this warning, including many legitimate developer utilities. The warning does not mean the file is dangerous.
To proceed through the SmartScreen warning:
- When the popup appears, click “More info” (the blue link at the bottom of the dialog).
- A “Run anyway” button will appear at the bottom right — click it.
- Untrunc will open normally and will not trigger the warning again for that executable.
Pro tip: If you want to verify the download yourself before running it, you can scan the ZIP file at VirusTotal.com by uploading it or pasting its SHA256 hash. Most results show 0-2 false positives, which is consistent with legitimate open-source software.
For complete peace of mind, download from our Download section, which links directly to the official GitHub release, not a third-party mirror.
What are the system requirements for Untrunc?
Untrunc is extremely lightweight and runs on virtually any modern or older PC. The minimum requirement is Windows 7 SP1 (32-bit or 64-bit) with 256 MB of available RAM and 10 MB of disk space for the tool itself.
For the recommended setup, use Windows 10 or Windows 11 (64-bit) with at least 1 GB of RAM for processing large video files. The tool does not require a GPU, does not need .NET Framework, and does not require Visual C++ Redistributables beyond what comes with the ZIP. On 64-bit Windows 10 and 11, the tool runs as-is with no additional setup.
The key non-hardware requirement is a healthy reference video from the same camera. Without a matching reference file, Untrunc cannot reconstruct the moov atom regardless of how powerful the computer is.
- OS: Windows 7 SP1 or later (x86 or x64)
- CPU: Any 1 GHz or faster processor
- RAM: 256 MB minimum, 1 GB+ recommended for large files
- Disk: 10 MB for the tool, plus space for the repaired output file
- Internet: Not required after download — Untrunc works fully offline
Pro tip: The x64 build runs noticeably faster on large files (2 GB+) due to better memory handling. Always use the 64-bit version on 64-bit Windows unless you specifically need the 32-bit build for compatibility testing.
Full system requirements are listed in the System Requirements table above.
How does Untrunc repair a corrupted MP4 file?
Untrunc repairs corrupted MP4 files by reconstructing the missing moov atom — the metadata block that tells media players how to read the video and audio tracks in the file. When a recording is interrupted before the camera finishes writing this atom, the file becomes unreadable despite containing all the raw video data.
The repair process works in three phases. First, Untrunc reads the moov atom from your healthy reference video, extracting the codec parameters (H.264 profile, resolution, frame rate, audio sample rate) and sample table structure. Second, it scans the damaged file from start to finish looking for raw video and audio frames that match the codec signature extracted from the reference. Third, it reassembles a new sample table that maps each found frame to its position in the file, then writes a new moov atom containing this table, producing the repaired output file.
The repair is lossless from a quality perspective. The raw video data in the broken file is never re-encoded or modified — only the index structure is rebuilt. Resolution, bitrate, frame rate, and audio fidelity are preserved exactly as originally recorded.
Pro tip: The repair works best when the reference video was recorded in exactly the same video mode as the broken file. A mismatch in frame rate (e.g., 30fps reference vs 60fps broken) or resolution can cause Untrunc to misidentify frame boundaries and produce a partially repaired or unplayable output.
See the Getting Started guide for step-by-step instructions on running a repair.
Why do I need a reference video to use Untrunc?
Untrunc requires a reference video because it uses that file’s moov atom as a template for rebuilding the missing metadata in the broken file. The moov atom contains codec-specific information — such as the exact H.264 parameter sets, track layout, and sample duration patterns — that is unique to each camera’s encoding configuration. Without a reference from the same camera, Untrunc has no way to know what codec format the broken file uses or how its frames are structured.
Think of the moov atom as a table of contents for the video file. The raw video data (the “mdat” atom) is still present in the broken file, but without the table of contents, media players cannot navigate it. The reference video provides an identical table of contents structure, which Untrunc adapts by scanning the broken file’s data to fill in the actual byte offsets and durations.
The reference video does not need to be from the same recording session — just the same camera in the same video mode. A 30-second clip filmed the same day works just as well as a multi-hour recording. The content (what was filmed) is irrelevant; only the technical encoding parameters matter.
Pro tip: Make a habit of keeping at least one short reference clip for each camera you own, stored on your computer where you can find it quickly. Many users keep a folder called “Reference Videos” with one clip per camera model and video mode (e.g., “GoPro-Hero12-4K60.MP4”).
If you truly have no reference video from the same camera, some users have reported partial success using a reference from the same camera model (different unit) in the same recording mode, though results vary significantly.
Does Untrunc work on macOS and Linux?
Yes, Untrunc supports macOS and Linux in addition to Windows. However, pre-built binaries are only provided for Windows — macOS and Linux users need to either build from source, use a package manager, or run a Docker container.
On macOS, the easiest installation method is Homebrew. With Homebrew installed, run brew install untrunc in Terminal. This downloads and compiles Untrunc with all required FFmpeg dependencies automatically. The process takes a few minutes on the first install but requires no manual dependency management afterward. The tool works on both Intel Macs and Apple Silicon (M1, M2, M3) Macs.
On Linux, you have three options:
- Build from source: Install the FFmpeg development libraries (
libavformat-dev,libavcodec-dev,libavutil-dev) and runmakein the cloned repository directory. - Docker: Pull and run the
rodolfoap/untruncDocker image, which includes all dependencies pre-installed. This is the fastest option on Debian/Ubuntu. - Snap: On Ubuntu and other Snap-enabled distributions, install via the Snap store for a pre-packaged build.
- Arch Linux (AUR): Install the
untrunc-gitAUR package usingyayorparu.
Pro tip: The Docker method is the most reliable on Linux if you want to avoid dependency conflicts. Run: docker run --rm -v /your/video/folder:/data rodolfoap/untrunc reference.mp4 broken.mp4
See the Download section for platform-specific links to the GitHub repository.
What video formats does Untrunc support?
Untrunc supports four video container formats: MP4 (.mp4), MOV (.mov), M4V (.m4v), and 3GP (.3gp). All four are based on the MPEG-4 container specification and share the same underlying atom structure, which is why the same moov atom reconstruction technique works across all of them.
Within these containers, Untrunc handles a wide range of codecs. For video, it works with H.264 (AVC), H.265 (HEVC), MPEG-4 Part 2, and Sony XAVC. For audio, it handles AAC, AC-3, and PCM tracks. The tool was specifically extended in the anthwlock fork to support GoPro’s custom MP4 extensions and Sony’s XAVC container variations used in Alpha and FX-series cameras.
Untrunc does not support AVI, MKV, WMV, FLV, or other non-MP4 container formats. For AVI repair, DivFix++ is an alternative. For MKV repair, mkvalidator or mkvmerge with error handling can recover some damaged files.
What Untrunc cannot fix:
- Files where the raw video data itself is corrupted (physical disk sector errors)
- Completely empty files (0 bytes)
- Files with an intact moov atom that plays incorrectly — that is a codec issue, not a container issue
- Non-MPEG-4 container formats (AVI, MKV, WMV, etc.)
Pro tip: If you are unsure whether your file is an MPEG-4 container, open it in MediaInfo (free tool) and check the Format field. If it says “MPEG-4” or “QuickTime,” Untrunc can likely repair it.
See the Features section for more on supported formats and codecs.
Can Untrunc repair GoPro video files?
Yes, Untrunc is one of the most effective free tools for repairing corrupted GoPro MP4 files. GoPro cameras are among the most common sources of truncated video files because they record to microSD cards and write the moov atom only after a clean shutdown. When a GoPro powers off unexpectedly — due to a dead battery, a crash, or a card pulled mid-recording — the resulting MP4 lacks its moov atom and will not play.
The anthwlock fork of Untrunc includes specific handling for GoPro’s custom MP4 atom extensions (“GoPro metadata” or GMPD atoms). This means the repaired file retains the GoPro-specific metadata embedded in the recording, including GPS data from GPS-enabled models (Hero 5 and later), accelerometer and gyroscope data, and scene information used by GoPro’s editing software (Quik).
GoPro repair workflow:
- Find a healthy GoPro file from the same camera in the same recording mode (same resolution, same frame rate, same EIS setting).
- Run:
untrunc.exe GoPro_reference.MP4 GoPro_broken.MP4 - If the repair fails, try adding
-sto skip unknown GoPro metadata atoms:untrunc.exe -s GoPro_reference.MP4 GoPro_broken.MP4 - Verify the output file in VLC or GoPro Quik.
Pro tip: GoPro footage repaired with the -s flag may lose the embedded GPS/telemetry data, but the video and audio tracks will be intact. If you need the telemetry, try the repair without -s first, and only add the flag if the default repair fails.
Visit the Getting Started guide for the complete repair walkthrough.
Untrunc vs Stellar Repair for Video — which is better?
Untrunc and Stellar Repair for Video are both effective video repair tools, but they target different users. Untrunc is better for technically comfortable users who have a reference video available and want a free, no-compromise solution. Stellar Repair for Video is better for users who want a polished GUI, do not have a reference video, and are willing to pay around $59 for a supported commercial product.
Here is a direct comparison:
- Price: Untrunc is free (GPL-2.0). Stellar Repair costs $59 per year for personal use.
- Reference video: Untrunc requires one. Stellar Repair has an “Advance Repair” mode that also needs a sample video, plus a “Quick Repair” mode that attempts repair without one (with lower success rates).
- Interface: Untrunc has a basic GUI and a CLI. Stellar Repair has a polished, beginner-friendly GUI with previews.
- Format support: Both support MP4, MOV, M4V. Stellar also supports MKV, AVI, FLV, MTS — formats that Untrunc cannot repair.
- Success rate: When a matching reference video is available, Untrunc generally achieves the same or better repair quality than Stellar’s Advance Repair mode for MP4/MOV files.
- Privacy: Untrunc runs offline and never uploads your video data. Stellar is also locally installed, but it is closed-source.
Pro tip: Try Untrunc first — it is free and the repair either works or it does not, with no financial risk. If you need to repair AVI, MKV, or FLV files, or if you have no reference video at all, Stellar’s Quick Repair mode is worth considering.
Download Untrunc from our Download section to try it at no cost before committing to a paid tool.
How to fix Untrunc not working or producing an unplayable output?
If Untrunc produces an unplayable output file or errors out during repair, the most common cause is a reference video that does not closely match the broken file’s encoding parameters. Work through these troubleshooting steps in order before concluding the file is unrecoverable.
- Verify your reference video matches: Both files must come from the same camera model in the same recording mode (resolution, frame rate, video codec, audio codec). Open both files in MediaInfo and compare the Format Profile, Width, Height, Frame rate, and Codec fields. Any difference in these values is likely causing the failure.
- Try a different reference clip: Sometimes a reference clip from the same day or a very similar recording session works better than an older clip. Try 2-3 different reference files.
- Add the
-sflag: Rununtrunc.exe -s reference.mp4 broken.mp4. This tells Untrunc to skip atom types it does not recognize rather than aborting. It helps with files that contain GoPro or Sony-specific metadata atoms. - Check the broken file size: If the broken file is 0 bytes, the video data was never written and cannot be recovered by any tool. If it is very small (under 1 MB) for what should be a long recording, most of the data may be missing.
- Enable maximum logging: Run with
-log 4and share the output on the GitHub Issues page. The log shows exactly where the repair fails and helps maintainers suggest a fix. - Try re-muxing the output: If the repaired file plays in VLC but not in other players, run
ffmpeg -i broken_fixed.mp4 -c copy output.mp4to re-mux it into a clean container.
Pro tip: The repair log will mention “unknown bytes” or “bad interleave” if the file structure is unusual. This is not necessarily a failure — Untrunc may still produce a usable output. Always check the resulting _fixed file even if the log shows warnings.
If none of these steps resolve the issue, open a GitHub issue with your camera model, video mode, file sizes, and the full -log 4 output for community assistance.
How do I update Untrunc to the latest version?
Untrunc does not include an auto-updater. To update to the latest Windows binary, visit the anthwlock/untrunc GitHub Releases page and download the most recent ZIP archive. Replace the old executables in your untrunc folder with the new ones from the downloaded ZIP.
The update process on Windows takes under a minute:
- Go to the GitHub Releases page for anthwlock/untrunc.
- Download the latest
untrunc_x64.zip(or x32 for 32-bit systems). - Extract the ZIP to a temporary folder.
- Copy the new
untrunc.exeanduntrunc-gui.exe(and any updated DLL files) into your existing untrunc installation folder, overwriting the old files. - Delete the temporary folder.
The latest release is dated 2020-03-24 from the anthwlock fork — the project reached a stable state and updates are infrequent. If you are already running the “latest” tag build, you have the current stable version. Some users track alternative forks such as fr0stb1rd/untrunc for more recent development activity.
Pro tip: Click the “Watch” button on the GitHub repository and select “Releases only” to receive an email notification whenever a new release is published. This way you do not need to check manually.
Alternatively, on macOS with Homebrew, simply run brew upgrade untrunc to update to the latest available version.
Can Untrunc repair very large video files (over 2 GB)?
Yes, Untrunc handles files larger than 2 GB without any file size limit. The tool uses memory-efficient streaming to process files regardless of size, so it can repair multi-gigabyte 4K recordings, long security camera footage, and large RAW video files without running out of memory or hitting OS file size restrictions.
The 2 GB limit is a legacy restriction from older FAT32 file systems and 32-bit applications that used 32-bit file size integers. Untrunc’s 64-bit build (x64) uses 64-bit file addressing natively, so it can work with files up to the theoretical limit of your file system (4 TB+ on NTFS, exFAT, and ext4). Even the 32-bit (x86) build handles large files correctly because it uses proper 64-bit file I/O calls.
Processing time increases roughly linearly with file size. A 1 GB file typically repairs in under 30 seconds on a modern desktop. A 20 GB file may take 5-10 minutes. A 100 GB multi-hour security recording could take 30-60 minutes, though the actual time depends heavily on drive read speed (NVMe SSD vs mechanical HDD) and CPU clock speed.
Pro tip: If you are processing a very large file from a slow external drive, copy the broken file to a fast internal SSD before running Untrunc. This can cut processing time significantly since Untrunc does multiple sequential read passes over the broken file during sample scanning.
Make sure you have enough free disk space for the repaired output file, which will be similar in size to the original broken file. Check available space before starting a repair of a large file.
What is a moov atom and why does it matter for video repair?
The moov atom is a metadata container within an MPEG-4 file (MP4, MOV, M4V, 3GP) that stores the structural index for all video and audio tracks in the file. It tells media players where each frame is located within the file, how long each frame lasts, what codec was used, what the resolution and frame rate are, and how the video and audio tracks are synchronized. Without it, the file’s raw media data is present but completely inaccessible to any player.
In a normally completed recording, cameras write the raw video frames continuously to the “mdat” (media data) atom throughout the recording, then write the moov atom in a single final operation at the very end of the recording. This is why interrupted recordings lose the moov atom: the camera ran out of power, the card was removed, or the recording application crashed before this final write operation completed.
Some cameras (and modern recording software) use a “moov-first” or “fragmented MP4” (fMP4) mode where the moov information is written progressively throughout the recording rather than just at the end. Files produced in fMP4 mode are naturally more resilient to interruption and typically do not need Untrunc. However, most consumer cameras use the traditional mode where moov is written last, making them vulnerable to truncation.
Pro tip: If you want to check whether a file has a moov atom, run ffprobe broken.mp4 (requires FFmpeg). If the output shows stream information, the moov atom is present and the file is likely playable. If ffprobe returns an error like “moov atom not found,” Untrunc is the right tool to try.
Learn more about how Untrunc reconstructs the moov atom in the Overview section above.
Where is the official download for Untrunc?
The official download for Untrunc Windows binaries is the anthwlock/untrunc repository on GitHub. The direct download links for the latest Windows builds are listed in the Download section on this page, which links directly to GitHub’s release CDN: github.com/anthwlock/untrunc/releases/download/latest/untrunc_x64.zip (64-bit) and untrunc_x32.zip (32-bit).
The original project by Federico Ponchio lives at github.com/ponchio/untrunc, but the original repository only provides Linux source code with no Windows binaries. For Windows users, the anthwlock fork is the standard recommendation across video repair communities, Reddit, and VideoHelp.com forums.
There are several third-party sites that host repackaged versions of Untrunc bundled with adware installers or additional software. Avoid these. You can identify safe downloads by checking that the file comes directly from github.com or codeload.github.com in your browser’s download dialog. If the download URL points to a third-party domain, do not use it.
The VideoHelp.com listing for “Untrunc GUI” also provides a clean download link directly from GitHub and is a trusted secondary source used by the video recovery community.
Pro tip: Bookmark the GitHub Releases page directly: github.com/anthwlock/untrunc/releases. This way you always get the most current official build rather than a potentially outdated cached copy from a mirror site.
How to uninstall Untrunc completely from Windows?
Untrunc requires no installation and therefore has no uninstaller. Because the tool is a portable application distributed as a ZIP archive, removing it is simply a matter of deleting the folder where you extracted it. There are no registry entries, no system DLLs, no startup entries, and no user data stored outside the extracted folder.
Complete removal steps:
- Close any open instances of
untrunc.exeoruntrunc-gui.exe. - Navigate to the folder where you extracted the Untrunc ZIP (e.g.,
C:\Tools\untrunc\). - Delete the entire folder. Send it to the Recycle Bin, or hold Shift+Delete to permanently delete it.
- If you added the untrunc folder to your Windows PATH, open System Properties > Environment Variables > Path, find and remove the entry.
- That is all — there is nothing else to clean up.
You can verify the removal by searching your Start menu for “untrunc” — nothing should appear. The Windows Registry contains no untrunc entries because the tool never writes to it.
Pro tip: Before deleting, consider whether you want to keep your reference video files. Those are separate from the Untrunc tool and exist wherever you stored them. The tool itself leaves no trace of what files it processed.
If you want to reinstall in the future, simply download a fresh ZIP from our Download section and extract it to a new folder.
Does Untrunc work offline?
Yes, Untrunc works entirely offline. Once downloaded, the tool requires no internet connection to function. The repair process reads two local files (the reference video and the broken video) and writes one local output file. No data is uploaded, no license server is contacted, and no telemetry is sent anywhere.
This matters for users repairing sensitive footage — security camera recordings, legal evidence video, private footage, or confidential professional productions — where uploading files to cloud-based repair services would be inappropriate. Untrunc processes everything locally on your own hardware, so your video content never leaves your machine.
The only online activity associated with Untrunc is the initial download from GitHub and any voluntary community interaction (submitting issues, checking for updates). The executables themselves contain no network code beyond what the operating system provides.
This also makes Untrunc suitable for air-gapped environments such as law enforcement forensics workstations, secure government systems, and corporate networks with strict outbound traffic restrictions. You can copy the extracted ZIP folder to a USB drive and run it on any Windows computer, connected or not.
Pro tip: If you need to regularly repair footage on an offline workstation, keep a copy of the Untrunc ZIP on a USB drive along with your reference video collection. This gives you a complete portable repair kit that works anywhere without internet access.
Download Untrunc once from our Download section and it works indefinitely with no required connection.
Can Untrunc fix DJI drone video files?
Yes, Untrunc can repair DJI drone MP4 files that were truncated due to a mid-flight crash, battery depletion, or storage card error. DJI cameras (on Mavic, Mini, Phantom, Inspire, and Action series) record in standard MP4 and MOV containers with H.264 or H.265 video, making them compatible with Untrunc’s moov atom reconstruction technique.
DJI drone repairs are a common use case in the Untrunc community. Forum posts and GitHub issues from DJI users report successful recovery of footage from crashed Mavic 3, Mini 3 Pro, and FPV drone recordings where the drone lost power mid-flight and the SD card was recovered from the wreckage. The key is having a healthy reference clip from the same drone in the same video mode.
DJI-specific repair tips:
- Match the video mode exactly: resolution (4K/2.7K/1080p), frame rate (24/25/30/60fps), and codec (H.264 or H.265). DJI’s H.265 and H.264 modes produce different moov atom structures.
- DJI files contain proprietary metadata atoms (DBGI, DBGX). If the default repair fails, try adding
-sto skip these atoms. - Some DJI models split long recordings into 4 GB segments. Repair each segment individually with the same reference file.
- D-Log and Normal color profiles can affect codec initialization in subtle ways. Use a reference filmed in the same color profile as the broken file when possible.
Pro tip: After a successful DJI repair, run the output through DJI’s own editing tools or ffprobe to verify the embedded telemetry (GPS, altitude, speed) is intact. The telemetry atoms are often preserved even when -s is used, but it is worth checking if that data matters to you.
See the Getting Started guide for the complete repair workflow.
How to use Untrunc on the command line for beginners?
Using Untrunc on the command line is straightforward once you understand the two-file syntax. The entire repair operation is a single command: you provide the path to the healthy reference video first, then the path to the broken video. Untrunc writes the repaired file to the same folder as the broken video automatically.
Step-by-step CLI guide for Windows beginners:
- Press Windows key + R, type
cmd, and press Enter to open Command Prompt. - Navigate to your untrunc folder:
cd C:\Tools\untrunc(adjust the path to where you extracted the ZIP). - Type the repair command. Replace the paths with your actual files:
untrunc.exe "C:\Videos\reference.mp4" "C:\Videos\broken.mp4" - Press Enter. Watch the output. Progress lines appear as Untrunc scans the broken file.
- When done, look for the line:
Output: broken_fixed.mp4 - Find the
_fixedfile in the same folder as your broken video and verify it plays.
If your file paths contain spaces (which is common), always wrap them in double quotes, as shown above. Without quotes, Command Prompt treats spaces as argument separators and misinterprets the paths.
Useful optional flags to know:
-s— Skip unknown metadata atoms (try this if the default repair fails)--stretch— Fix audio-video sync in the repaired file-log 2— Show more detail in the progress output (0=quiet, 4=maximum)
Pro tip: You can drag and drop file paths from Windows Explorer into the Command Prompt window to avoid typing long paths. Drag the reference file first, add a space, then drag the broken file. The paths appear with correct quotes automatically in newer versions of Windows.
Prefer a graphical interface? See the Getting Started guide for GUI instructions.